Intro #
I’ve been using Jellyfin alongside Plex for quite some time now for my home media streaming needs. Jellyfin — being open source — allows users to use their GPU for transcoding (a paid feature on Plex). This VASTLY accelerates the speed of transcoding.
I run Jellyfin in a VM on Proxmox, so I need to pass the GPU through from the Proxmox host into the virtual machine, making it look, smell, and taste like the GPU is plugged in directly.
I had an old NVIDIA 1060 6GB laying around that I decided to use for this project. It supports HEVC HDR, which also enables HDR to SDR Tone-Mapping — which is SICK.
The purpose of this post is to provide a one-stop-shop guide to getting hardware transcoding with an NVIDIA GPU working inside a Debian-based virtual machine running on Proxmox.
The Proxmox Wiki has much of this information, some in more detail than I go into here, as well as troubleshooting steps. If you encounter errors or different behavior than I list here, check it out .
I plan on making a future post dedicated to PCI-Passthrough, with more complete detail, troubleshooting steps, and use-case examples.
BIOS Options #
There are a couple of BIOS options that need to be enabled before passthrough can be used. Most machines support this, but not all.
From the official Proxmox Wiki:
Your hardware needs to support IOMMU (I/O Memory Management Unit) interrupt remapping. This includes the CPU and the motherboard.
Generally, Intel systems with VT-d and AMD systems with AMD-Vi support this. But it’s not guaranteed everything will work out of the box, due to bad hardware implementation or low-quality drivers.
Server-grade hardware often has better support than consumer-grade, but many modern systems support this too.
Please refer to your hardware vendor to check if they support this feature under Linux for your specific setup.
To check support, reboot into your BIOS settings and enable any options that resemble the following (enable all that apply):
INTEL CPU:
- VT-d (Intel Virtualization Technology for Directed I/O)
- Intel VT for Directed I/O
- Intel Virtualization Technology
AMD CPU:
- IOMMU (Input-Output Memory Management Unit) I like that a lot.
- SVM (Secure Virtual Machine) – required alongside IOMMU
- AMD-Vi (older term for AMD IOMMU)
Once these settings are enabled, you’re ready to rock.
Proxmox Server Configuration #
Verify IOMMU is Working #
In recent Linux kernels (6.8 or newer), IOMMU is enabled by default on both Intel and AMD systems. Proxmox 8.4.5 (kernel 6.8+) falls into that category, so you shouldn’t have to tweak anything. Still, let’s verify:
-
In the Proxmox shell, run:
dmesg | grep -E 'DMAR|IOMMU|AMD-Vi' -
Look for lines like:
IOMMUDirected I/O or InterruptRemapping is enabled
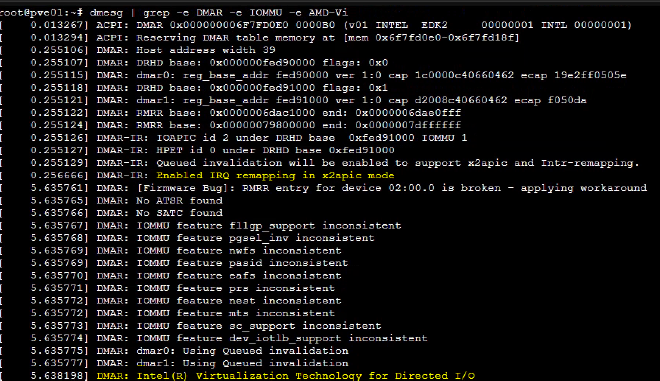
Note: You may see “inconsistent” or “error” messages on some CPUs (e.g., Intel 8700K)—that’s a known firmware quirk, and the kernel applies a workaround automatically. No need to panic if you spot those.
Once you see those options present: you’re good to continue.
OPTIONAL: Expand If You Did Not Get the Correct Output
If “Remapping is enabled” doesn’t appear, explicitly enable IOMMU in your GRUB settings:
-
Edit
/etc/default/gruband update theGRUB_CMDLINE_LINUX_DEFAULTline:- Intel:
GRUB_CMDLINE_LINUX_DEFAULT="quiet intel_iommu=on iommu=pt" - AMD:
GRUB_CMDLINE_LINUX_DEFAULT="quiet amd_iommu=on iommu=pt"
- Intel:
-
Save the file, then run:
update-grub2 reboot -
After reboot, re-run:
dmesg | grep -E 'DMAR|IOMMU|AMD-Vi'If you still don’t see “Remapping is enabled,” double-check your BIOS IOMMU settings — or your hardware may not support PCI passthrough. Consult the Wiki for more potential info
Identify GPU IOMMU Group #
Each PCI device on your Proxmox host is assigned to an IOMMU group. For GPU passthrough, your GPU HAS to be in its own group.
-
In the Proxmox shell, run:
pvesh get /nodes/{nodename}/hardware/pci --pci-class-blacklist ""Replace
{nodename}with your Proxmox host’s name. -
Look for your GPU in the output. You should see your GPU (and its audio controller) listed together in a standalone IOMMU group:
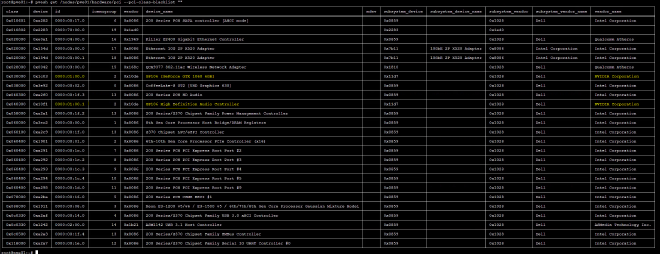
Tip: Even if you only plan to use the GPU for headless transcoding, passing through its audio function is best practice for full hardware support.
Load Kernel Modules #
We need to ensure the VFIO modules are loaded on the Proxmox host:
- In the Proxmox shell, run:
lsmod | grep vfio - You should see modules like:
vfiovfio_iommu_type1vfio_pci
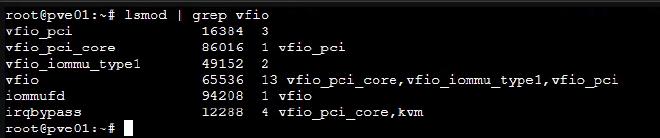
Tip: If you see these modules listed, you’re good to move on.
OPTIONAL: Expand if Modules are Not Loaded
If those modules aren’t present by default, add them to /etc/modules:
vfio
vfio_iommu_type1
vfio_pci
Then update initramfs and reboot:
update-initramfs -u -k all
reboot
After reboot, re-run:
lsmod | grep vfio
Then confirm the modules are loaded.
Proxmox VM Configuration #
At this point, all Proxmox configuration is complete, so let’s move on to the VM setup.
Note: This section introduces new variables—if you encounter any issues or different behavior, check the Proxmox Wiki for deeper explanations and troubleshooting.
Required VM Options #
- Some people select a specific CPU type when creating the VM, but I’ve set mine to host and it works perfectly.
- BIOS: OVMF (UEFI) — the most compatible and performant mode for PCI-passthrough.
- Memory: Disable memory ballooning to avoid passthrough issues.
Add the GPU as a PCI Device #
-
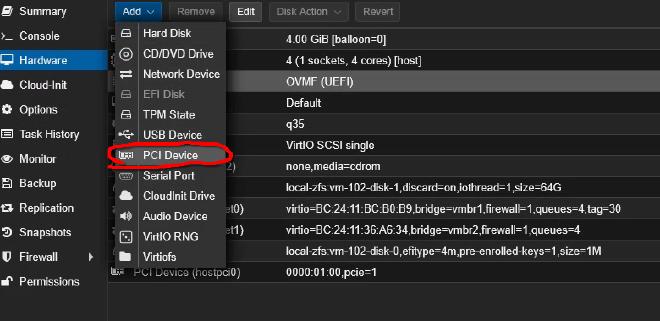
In the Proxmox web UI, select your VM → Hardware → Add → PCI Device.
-
Choose Raw Device, then select your GPU.
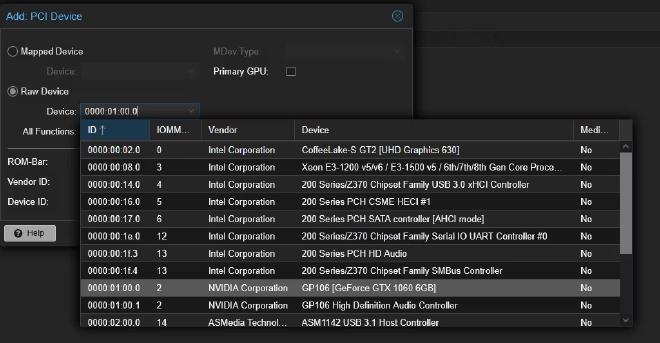
-
Check All Functions and PCI Express to include the audio controller.

Tip: Passing through the audio function is recommended, even for headless transcoding, for full hardware support.
After clicking Add, Proxmox will automatically bind the device to vfio-pci and make it unavailable to Proxmox. If you still see Proxmox using the GPU, refer to the Wiki’s driver blacklisting steps.
Verify the GPU Binding #
In the Proxmox shell, run:
lspci -k | grep -A 3 "VGA"
Find your GPU in the output and confirm:
Kernel driver in use: vfio-pci
If it shows vfio-pci, you’re ready to boot into the VM!
VM Level Configuration #
This section refernces configuration that happens Within the Virtual Machine itself. No longer the Proxmox Server
Verify Passthrough #
Inside of the VM, run the same command as earlier
lspci -k | grep -A 3 "VGA"
We are hoping to see our GPU appear here, similar to how it does in Proxmox, but using a different driver. This is the output that I get:

The first device that I show is unrelated and can be ignored.
The VM sees the GPU just as we hoped! This means the passthrough has worked!
Most likely your GPU will be using the nouveau driver as opposed to the Nvidia one that I show here. I have already installed the Nvidia drivers on this machine.
Installing Graphics Drivers #
Note: Required only for NVIDIA GPUs; AMD and Intel drivers are included in the Linux kernel.
I am using Ubuntu Server, if you’re on a different distro, just search online for NVIDIA driver install {Your-Distro}.
Ubuntu provides two driver sets: server and desktop. For a GTX 1060 6GB, the desktop set initializes correctly. The ubuntu-drivers tool will pick the best match automatically.
-
Install the NVIDIA driver
sudo ubuntu-drivers installThis pulls and installs the best-matched driver for your hardware.
-
Reboot (if prompted)
sudo reboot -
Verify the driver
nvidia-smiYou should see output with your GPU details:
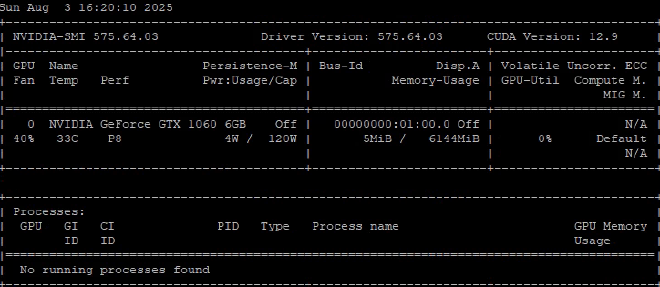
If nvidia-smi returns GPU information, the driver is installed and working!
Jellyfin Configuration #
The Jellyfin docs include walkthroughs for different GPU brands. For NVIDIA, follow these commands:
-
Install FFmpeg plugin and update packages:
sudo apt update && sudo apt install -y jellyfin-ffmpeg7 -
Install NVIDIA decode/encode libraries
Replace{DRIVER_VERSION}with the three-digit version fromnvidia-smi:sudo apt update && sudo apt install -y libnvidia-decode-{DRIVER_VERSION} libnvidia-encode-{DRIVER_VERSION}
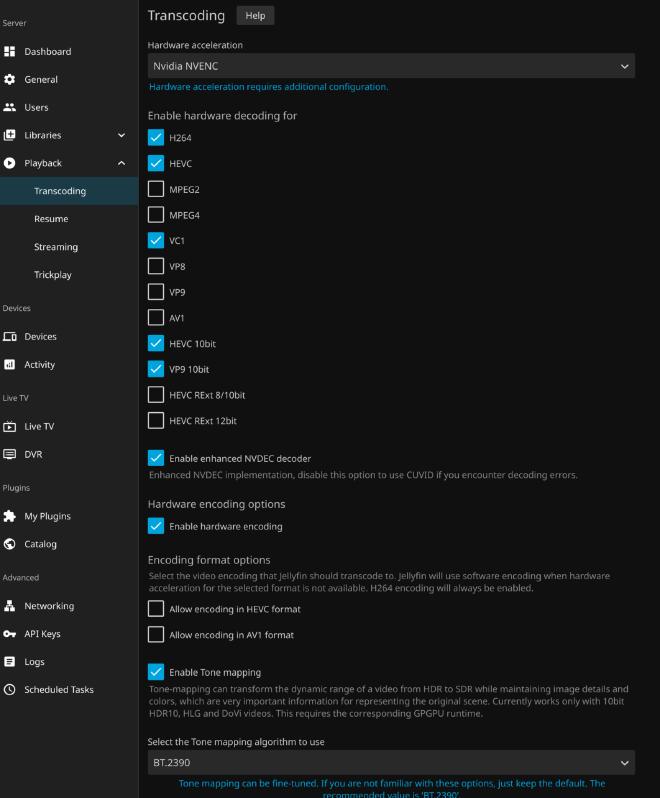
Enable Hardware Transcoding in Jellyfin #
- Open Administration Dashboard → Playback → Transcoding
- Under Hardware Acceleration, select NVIDIA NVENC.
- Enable Hardware Encoding and Tone Mapping.
- Check the codecs supported by your GPU (defaults usually suffice).
- (Optional) Set Encoding Preset to Slower for better quality at the expense of speed.(I do this, because its noticeably better quality, but it still rips on speed)
- Enable Delete Segments to delete stored transcodes after the client downloads them.
I once filled up all my disk space testing 4K transcodes and crashed the server! I had recover from a backup haha. Learned my lesson and use the Delete option now.
Your Jellyfin server is now configured for hardware-accelerated transcoding!
Giving It a Test #
Fire up a movie in Jellyfin and set the playback bitrate to around 15–20 Mbps. Then:
-
Open Playback Info and look for a high transcoding speed (e.g., 9–12×).
-
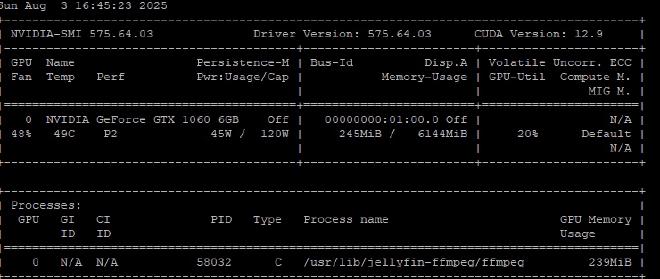
Optionally, rerun
nvidia-smion the host or in the VM to see active transcode processes:nvidia-smi
Conclusion #
That’s it! You can now rip along transcoding you media. I also love that I enjoy my 4k blurays on SDR with having tone-mapping.
I hope this guide helped! There were definitely a few complex topics covered. PCI-Passthrough is kind of a beast. Both to cover, and to implement!