Video Walkthrough #
Intro #
Ansible is an open-source tool that allows for centralized automation of Linux hosts. It can be configured to run all sorts of remote commands on hosts—from updates to config changes and more.
Some Considerations #
It’s important to think about where you want to install Ansible. Since it requires SSH access to all the hosts on your network you plan to manage, this could open your network up a bit. In my case, I have a MGMT network that already has SSH access to all my other networks, so I’m going to install it there.
Ansible communicates over SSH for remote commands. Depending on what you want Ansible to do—like updates or anything that needs sudo—you’ll need to SSH as a user that can run passwordless sudo. I’ll cover how to set that up later. Best practice is to create a new user called ansible and give it passwordless sudo. But in a homelab, just using your main user is probably fine too.
Installing Ansible #
For Debian-based systems:
sudo apt update
sudo apt install ansible -y
Confirm it’s installed with:
ansible --version
If you get something back, you’re good!
Configuration #
Generating the SSH Keys #
Run this on the Ansible controller:
ssh-keygen
This generates a key that we’ll use to securely connect to remote hosts. (I’m just going to use a single key for all my hosts. Realistically, that’s fine—especially in a homelab. In enterprise, I’d use different keys per host to limit exposure if one key gets compromised.)
Just press enter through the prompts and save to the default location. Don’t set a password—that’ll cause Ansible to fail.
Passwordless Sudo and User Creation #
As mentioned earlier, if you want to run sudo commands, the user needs to be able to do that without a password.
You’ll need to do this on each remote client, as well as localhost if you’re including that.
If you remote in as root, you already have passwordless sudo. In my case, I’ve disabled the root account.
For a homelab, you can just enable passwordless sudo on your main user. But if you want to tighten things up a bit, you can create a dedicated ansible user with no password set—so SSH key auth is the only way in. That’s what I’m doing here.
Here’s a nice little script to handle the Ansible user creation, restriction, and passwordless sudo set up. SSH to the remote host as your admin user.
Replace PUBLIC_KEY with the contents of the file you just created. Most likely this is ~/.ssh/id_ed25519.pub: You can view and copy by just running cat ~/.ssh/id_ed25519.pub in your terminal. If you have forgotten the name of the file, just run ls -la ~/.ssh/*.pub
set -e

ANSIBLE_USER="ansible"
SSH_DIR="/home/$ANSIBLE_USER/.ssh"
AUTHORIZED_KEYS="$SSH_DIR/authorized_keys"
SUDO_FILE="/etc/sudoers.d/ansible"
PUBLIC_KEY="ssh-rsa AAAAB3...replace_this_with_yours... user@yourmachine"

echo "Creating user '$ANSIBLE_USER'..."
if ! id "$ANSIBLE_USER" &>/dev/null; then
  sudo adduser --disabled-password --gecos "" "$ANSIBLE_USER"
else
  echo "User '$ANSIBLE_USER' already exists. Skipping creation."
fi

echo "Setting login shell to /bin/sh..."
sudo usermod -s /bin/sh "$ANSIBLE_USER"

echo "Disabling password login..."
sudo passwd -l "$ANSIBLE_USER"

echo "Preparing SSH directory..."
sudo mkdir -p "$SSH_DIR"
sudo touch "$AUTHORIZED_KEYS"
echo "$PUBLIC_KEY" | sudo tee -a "$AUTHORIZED_KEYS" > /dev/null

sudo chmod 700 "$SSH_DIR"
sudo chmod 600 "$AUTHORIZED_KEYS"
sudo chown -R "$ANSIBLE_USER:$ANSIBLE_USER" "$SSH_DIR"

echo "Setting up passwordless sudo for '$ANSIBLE_USER'..."
echo "$ANSIBLE_USER ALL=(ALL) NOPASSWD: ALL" | sudo tee "$SUDO_FILE" > /dev/null
sudo chmod 440 "$SUDO_FILE"

echo "Ansible user fully configured with /bin/sh, key auth, and passwordless sudo."
If you wish to not use this script, and just assign passwordless sudo to your primary user:
Run:sudo visudoThen add this line to the end of the file: (change YOURUSERNAME to your actual username of course)
YOURUSERNAME ALL=(ALL) NOPASSWD: ALL
Set up the Hosts File #
We need a file at /etc/ansible/hosts that lists all the hosts we want to run commands on:
sudo nano /etc/ansible/hosts
If the /etc/ansible directory doesn’t exist, you can create it with:
sudo mkdir -p /etc/ansible
Then you can create or edit the hosts file as needed.
Format:
[remote_hosts]
192.168.1.100 ansible_user=ansible
192.168.1.101 ansible_user=ansible
192.168.1.102 ansible_user=ansible
If you want to include the local host:
[local]
localhost ansible_connection=local ansible_user=ansible
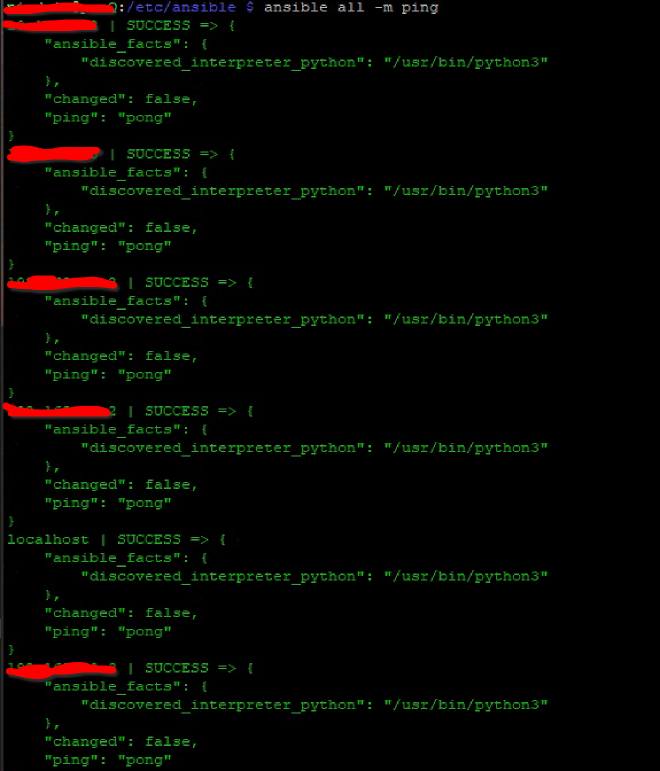
Test It #
ansible all -m ping
If it comes back with pong for all hosts, you’re golden!
Build a Playbook #
I made a simple update playbook to update and reboot all systems (including localhost). I wrote it in two parts so localhost doesn’t reboot before the remotes are done. It does an apt update then apt upgrade, then removes unnecessary packages.
Create:
sudo nano /etc/ansible/update.yml
Paste this in:
---
- name: Update and reboot all remote hosts
  hosts: remote_hosts
  become: true
  tasks:
    - name: Update apt package cache
      apt:
        update_cache: yes

    - name: Upgrade installed packages
      apt:
        upgrade: yes

    - name: Autoremove unnecessary packages
      apt:
        autoremove: yes

    - name: Force reboot regardless of reboot-required file
      reboot:
        msg: "Rebooting system after update"
        connect_timeout: 5
        reboot_timeout: 600
        pre_reboot_delay: 0
        post_reboot_delay: 30

- name: Update and reboot localhost
  hosts: localhost
  become: true
  tasks:
    - name: Update apt package cache
      apt:
        update_cache: yes

    - name: Upgrade installed packages
      apt:
        upgrade: yes

    - name: Autoremove unnecessary packages
      apt:
        autoremove: yes

    - name: Force reboot localhost
      reboot:
        msg: "Rebooting localhost after update"
        connect_timeout: 5
        reboot_timeout: 600
        pre_reboot_delay: 0
        post_reboot_delay: 30
Dry Run #
Run:
ansible-playbook update.yml --check
You’ll see a nice output showing what each host would do.
Note: localhost will fail on reboot because Ansible doesn’t want to reboot the controller. That’s fine—just reboot it manually. I left that in to remind myself to reboot after everything else finishes.
Real Test #
If you haven’t set up passwordless sudo:
ansible-playbook update.yml --limit 192.168.1.100 --ask-become-pass
If you have:
ansible-playbook update.yml --limit 192.168.1.100
Obviously replace this IP with the actual IP of your remote system
Closing #
That’s about it! I’ve really only cracked the iceberg here with what you can do with Ansible. You can automate any command you wish to run just about.
Updating was my main use-case but I know people that use Ansible to deploy configuration changes in production, use it in combination with monitoring tools to probe and provide metrics, and all sorts of other neat stuff.