
If you ask the internet how to secure your home network, you get a bunch of things like firewalls, VLANs, Pi-holes. Do you really need any of it? The short answer is not really, at least not yet. What you actually need, and what carries a lot of weight, is just some simple changes on the stuff you already got.
So I’m going to rank the normal changes you see online, and tell you what each one does and what it doesn’t do.
Watch the Video #
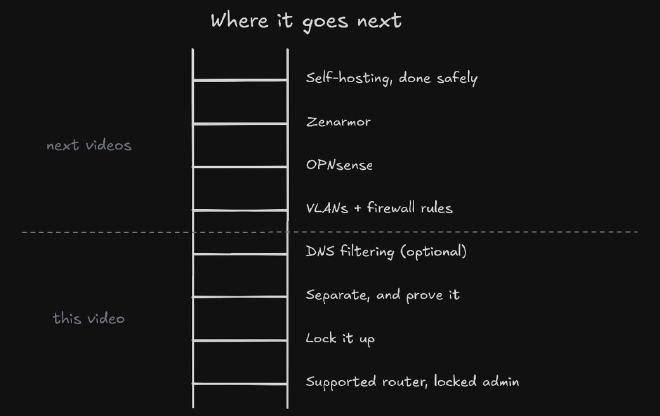
The Ladder #
Number one place to start is the router. That’s ground zero. This is the bottom of the ladder; everything above it is optional, and that might be in some future videos.
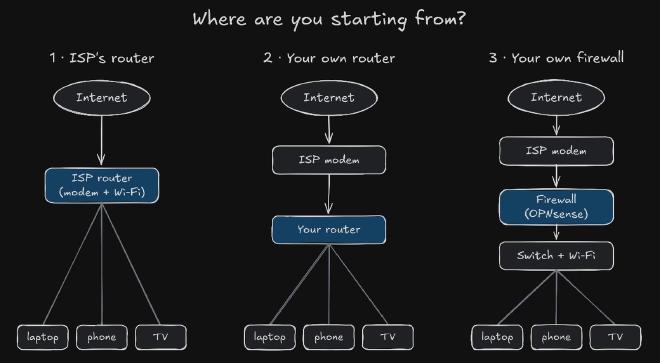
Where Are You Starting From? #
The short answer is it doesn’t really matter. Everything here works in every one of these.
- The ISP’s router. Most people are probably going to find themselves here. That’s your normal internet: you have Cox or AT&T, you get that little three-in-one box, and it’s got everything. It’s your Wi-Fi, it’s your modem, it’s your router. It’s just the box that works.
- Your own router. That’s fairly common too if you’re kind of the next rung up, and the ISP sends you a modem.
- Your own firewall, like OPNsense or anything else.
1. Keep the Router Updated #
Whatever box you have, is it getting updates? That’s the most important thing out of the gate. This one box does everything. Every rule you set lives in this box. So ground zero is you need to make sure it’s still getting security updates.
You can look up your model on the vendor’s website, and it should tell you if it’s still supported. If it’s the ISP’s box, ask them who updates it.
This is really important. It’s not theoretical. The FBI gave a big warning that old end-of-life routers are being hijacked and used as proxies. This stuff’s no joke. If you’re on the ISP’s box, the router is the barrier between you and the wide open internet. That’s your one line of defense. So if it goes stale, it’s public to the internet, and everybody can just be hacking against it.
End of life means the vendor has stopped releasing updates and security patches. The FBI found end-of-life routers with remote administration turned on compromised by a variant of TheMoon malware, which “allows cyber actors to install proxies on unsuspecting victim routers and conduct cyber crimes anonymously.”
2. Lock the Admin Side #
- The admin login. You need to change it. That’s the little sticker on the bottom of the router that says, you know, noisy potato or whatever it is, to log into it with the default credentials. Change that. Don’t leave that just how it is. I don’t think I need to elaborate too much on why that’s a bad idea. Make it something that’s original, and not your Wi-Fi password.
- Remote admin. Same deal: turn it off, unless you actually manage the router from outside of your home. Remote admin puts the router’s login page on the internet.
- The router’s app. If your router has an app, like most do, make sure that app is locked down. The account on that app can see and do anything. So unique password and MFA, all the time.
3. Wi-Fi Settings That Actually Matter #
WPA3 #
WPA is the Wi-Fi protection standard that routers use. WPA3 is the betterest one. WPA2 is also okay. You might find that some things fail to connect to WPA3. You sometimes have a WPA3/WPA2 mode, and that is also okay. You can also use just straight-up WPA2 with AES only, if you have to or that’s just what your router supports. Never WPA1; get off of it. WPA2 minimum, WPA3 best.
Apple’s router settings guide ranks them the same way. Watch the names: WPA2/WPA3 Transitional is fine, but a WPA/WPA2 mixed mode, WEP, or anything with TKIP is on Apple’s list of weak settings to avoid.
Turn Off WPS #
I don’t know if anybody’s used this button before. Most routers have it. It might not all look the same or be spelled out; I know my Cox modem has it. Turn it off. You don’t need it.
What this button does, if you haven’t used it, is it allows you to bypass the Wi-Fi’s password. You can just walk up, hit the button, and pair your device to the Wi-Fi. Sometimes it makes you do a PIN, but that PIN can be guessed. Basically, just don’t use it. It’s not worth the convenience, and there are known security vulnerabilities around it. So stay away from WPS, TL;DR.
The PIN is the known vulnerability: a design flaw lets an attacker tell when the first half of the eight-digit PIN is right, which makes it much quicker to brute force.
Two That Don’t Help: Hidden SSID and MAC Filtering #
Some people will swear by hiding the Wi-Fi network’s SSID. That means when you open the Wi-Fi list, it just doesn’t appear. That doesn’t help at all. The devices will always keep calling out for it by name, so anybody just listening will still see the name anyways.
MAC filtering is one that’s also hugely overrated. People swear by this one. It means a device can only get on if its MAC address, its hardware address, is a known one, which is really cool. But every device broadcasts that MAC address out in the open, so anybody listening sees it and can just spoof it. That’s very easy to do, so it doesn’t provide a whole lot of security. For the hassle it is to set up, and especially the maintenance hassle on a home network, just don’t bother. The juice is not worth the squeeze.
Apple’s guide agrees on both: leave the network name visible, and don’t count on MAC filtering, because “MAC addresses can easily be copied, spoofed (impersonated), or changed.”
4. Close the Doors #
Next, we want to shut the door. We want to make sure nothing has any holes poked through the firewall, which is on the router, to the internet. All of this is in your router’s web UI or app.
Port Forwards #
Some of you who play video games for sure know about port forwarding. Those are ports on your PC open to the open internet. That’s sketchy.
Normal internet comes in, hits the firewall, gets blocked; nothing to it. But say I’ve got a port forward to my game console so I can play games. The console can go out to the internet, and that’s fine; everything else can go that way too. But now the internet can come in to my game console without me initiating that connection.
Sometimes you need it. If you do, research it, make sure it’s okay, open it for the time you need it, and then turn it right back off again. Don’t leave it open. That’s how the hacks happen.
Scroll through the list and you can see your port forwards. Check it even if you’ve never set one up, because UPnP (below) can add them for you. If you have IPv6, check that side too; Google’s Wifi routers, for example, call those port openings, separate from IPv4 port forwarding.
DMZ Host #
Then look through anything that says DMZ host, or just DMZ, period. That’s the same thing, but kind of even worse: that’s every door open to one box. Now, real DMZs get used in business all the time, when they’re locked down. These DMZs usually aren’t. So anything you don’t recognize, or don’t have an explicit need to have out there, you should get it out of there.
UPnP #
Last but not least, UPnP. You’ve probably heard of this one. This lets any device ask the router to open a port forward for itself without asking you. So pretty much, turn this off. Devices on your home network should not be opening ports on the firewall without you being aware of that. That’s a recipe for disaster. If you need something opened, open it yourself.
If you really can’t get by without it, like some game has to use it and you’re just stuck, turn it on, do your thing, but turn it back off when you’re finished. Or if you leave it on, know what it is and understand the risks.
Another good workaround, if your game is not working without UPnP, is a VPN that allows port forwarding, like Proton VPN (paid plans). I’ve used it. You can flip on the port forwarding feature and go like normal without having to open up ports in your home network. That’s the way I absolutely prefer to do it, and that’s what I recommend to you.
It’s still an open port on your PC, but your home IP and router stay closed.
The Firewall, IPv4 and IPv6 #
Most likely these are on by default. Just make sure the firewall is turned on for both. That’s really it.
A port check against your IPv4 address says nothing about IPv6, where your devices can have their own public addresses and the router’s IPv6 firewall is what protects them (RFC 6092). Don’t just switch IPv6 off; make sure the firewall covers it.
Closed Doors Aren’t the Whole Pie #
Just blocking the ports inbound is not the whole pie. Devices on the network can start any outbound connection, and you need that to be able to connect to the internet. But a device can start a connection to some cloud service that is a bad cloud service, and still do bad things to you on the return trip. Once that’s open, stuff can come through that tunnel. That’s why you also need to be wary about the devices you’re allowing to connect to your network.
The FBI found that some cheap off-brand streaming boxes, like those really cheap ones you can get, came infected before anybody bought them or set them up. They just got to your house infected. That’s why this next step is very important.
In the FBI’s words, criminals configured them “with malicious software prior to the users purchase”, or infected them as they downloaded apps during setup. Once on a home network, they can become part of the BADBOX 2.0 botnet and residential proxy services.
5. Separate What You Don’t Trust #
This creates walls within your network. They are called VLANs, but usually on those combo router things you get from your ISP, they’re not going to be enumerated as VLANs. What is pretty common on those devices is a thing called a guest network. This is super important, and this is how you want to run it: you want to separate what you don’t trust.
Your stuff stays on the main network: your phone, your NAS, whatever. The stuff you can’t patch, IoT devices, particularly sketchy devices, things you don’t trust, you put those on the other network. Basically, it’s a second Wi-Fi network that runs next to your main Wi-Fi network, and those devices can’t reach your main one. They hit a wall.
Connections from, say, your camera back to your laptop: axed. If the camera gets taken over, or the TV gets taken over, or whatever, it can’t crawl back to your other stuff. Separation limits what a bad device can reach, but it doesn’t make that bad device not a bad device, and it doesn’t stop it from phoning home.
Guest Isolation vs Client Isolation #
Devices can still talk to other things within that guest network. Long story short, stuff that traverses networks needs to be routed. Stuff that’s within a single network can just talk to whatever.
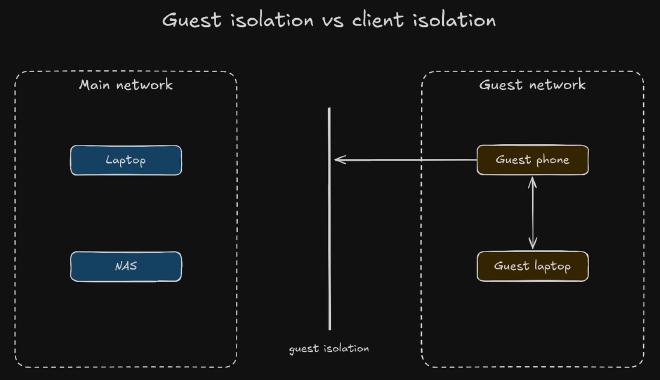
Keeping guests off your main network is guest isolation. Keeping them off each other too is client isolation, so one bad camera can’t get at the TV next to it. Some guest networks do both: on eero, guest devices can’t talk to the main network or to each other.
What It Can Break #
Sometimes this might cause an issue. Maybe your laptop needs to talk to your camera, and this would break that. But most often, in today’s age, unless you’re self-hosting, that connection is going out to the internet, past your router, and then back to your camera. So more often than not, this won’t actually break the IoT devices you’re running in your house.
What can break is the local stuff: casting from your phone to the TV, printing, and controlling smart-home devices from inside the house. Google tells you to turn client isolation off to set up its streaming devices. If the app controls the device through the company’s cloud, it often keeps working; it depends on the product.
If something you need breaks, don’t open the whole network back up for it. That’s what the next rungs are for.
Check the Setting, Not the Label #
What’s really important about this is you need to actually check and test the setting, because some routers will advertise guest networks or IoT networks but still let them talk to whatever is on your network. So you need to verify. Do some research, and make sure it’s actually enforcing those barriers like it should be.
On different devices it might be called different things, like “Access Intranet”, an on or off feature. Some will actually let you do full VLANs; it depends on how good the router is. If you’re in that second camp, where you have your own router and it’s a nice router, odds are you can probably set up your own networks, whether they’re called VLANs or not. Then your options might be kind of buried or use different wording, so it’s important to look this up and make sure you’re tracking with your specific model.
Here’s what a few vendors’ own support pages say, as of October 2026:
| Router | Guest network, per the vendor |
|---|---|
| TP-Link Deco | In router mode, guest and main are isolated automatically. In AP mode, an Allow Local Access toggle decides. |
| Other TP-Link routers | In access point mode, the guest network is no longer isolated from the main network. |
| ASUS | Uncheck the main network under Access Intranet to keep guests out. Works only in wireless router mode. |
| NETGEAR Nighthawk | Guest and primary devices can’t reach each other, either way. |
| NETGEAR Orbi | One checkbox, Allow guests to see each other and access my local network, cleared by default. |
| eero | Guest devices can’t reach the main network or each other. |
| Google Nest Wifi | Guests can use shared devices you choose, like a TV, speaker or printer. |
| Verizon CR1000A | The guest network is firewalled off. The IoT network isn’t: IoT and primary devices “can communicate with no firewall restrictions.” |
Access point (AP) mode is when the box only does Wi-Fi and something else does the routing. As TP-Link and ASUS show, separation can quietly stop working there. If your router isn’t listed, which includes most ISP boxes, test it.
The important thing to remember is this only covers Wi-Fi devices. If you’re not running your own firewall and switch, that’s probably fine, but anything that you plug in will still be on your main network on most routers. Some might let you change those assignments, but for the most part, unless you know that’s a feature, it’s probably not a feature.
Prove It #
Pick something you know works from your main network, like your NAS page or the router login, and try it from a phone on the guest network. It should fail. A failed ping on its own doesn’t prove much, so try the actual service, and if you have IPv6, test over that too.
6. DNS Filtering, If You Want It #
DNS filtering is awesome, and I employ it at my home network and at my business network, but it does have some holes. You’ve probably heard of a Pi-hole or AdGuard. That’s a DNS filter, or DNS sinkhole.
Basically, without getting into a DNS lesson: when your laptop wants to go to the internet, it asks, where is this name? When you go to youtube.com, a DNS (domain name system) server responds with the IP address that’s associated with that name, so your computer knows how to get there.
Pi-hole or AdGuard Home are small servers on your network that answer those lookups, so they sit between your machine and the internet. You’re running your own DNS server now. Instead of your laptop going directly to internet DNS, it goes laptop to Pi-hole.
Say the laptop asks for ads.tracker.example. First it asks the Pi-hole. The Pi-hole goes: okay, you want this? Wait, that’s on my bad list. No, thank you. So instead of returning the IP address for this name, it sends it to the sinkhole, and this is where it comes to die. To the user of the laptop, that’ll break the ad, and most often make it not load in the browser, but it can depend; it can also just appear as an empty white box. If the name’s not on its list, the Pi-hole forwards it on to the main internet DNS, and you continue on like normal.
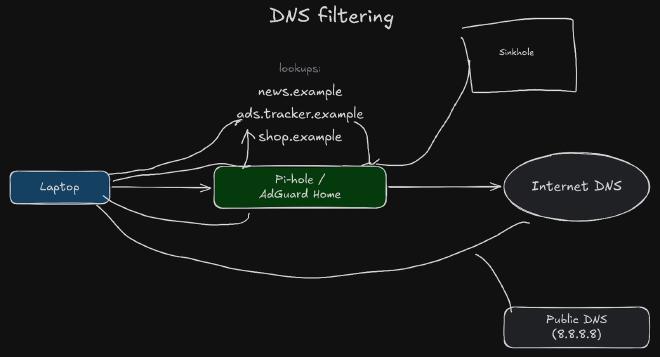
So this will catch general ads, trackers and known bad sites, just as long as the device actually asks for it. Now, the catch is it can only see names. It can’t see what’s on a page, it’s not behavioral-based, and it will miss anything that connects directly to an address without asking for the name first.
Ways Around It #
There are ways of defeating this. A big one is hard-coded DNS: if a device, an IoT device or your own, or your browser, is specifically using its own DNS, then it won’t go through your Pi-hole.
Another big one is DNS over HTTPS. If you’re a Firefox user, you’ve probably seen this in the privacy settings. That sends encrypted DNS traffic directly to a public DNS server, not your own, so that will also bypass your Pi-hole. Now, DNS over HTTPS is great. Usually DNS names are sent in plain text, so anybody looking at your network logs can see the websites that you went to. HTTPS encrypts those. Really, really, really nice. But if you’re doing that on the client itself, on your laptop, directly in your browser, it will bypass the Pi-hole protections.
Usually, by default, this works pretty good. This is not a Pi-hole setup guide, but if you set up DHCP to serve that DNS server, then you’re probably good. But still check.
| Way around | What happens |
|---|---|
| Hard-coded DNS | The device asks its own DNS server and ignores yours (Pi-hole forum). |
| Firefox DNS over HTTPS | The default setting first looks up use-application-dns.net, and turns itself off if your DNS says that name doesn’t exist. Pi-hole does that by default. DNS over HTTPS you turned on yourself ignores it (Mozilla, Pi-hole). |
| Chrome secure DNS | Automatic mode upgrades the DNS provider you already use, so it stays on your filter. A provider you pick by hand skips it (Chromium). |
| Android Private DNS | Set to a provider’s hostname, the phone sends its lookups to that provider instead (Google). |
| iCloud Private Relay | Relay covers Safari browsing and DNS lookups on Apple devices. A network can switch it off by blocking two Apple hostnames, and Pi-hole does by default, which gives up Relay’s privacy on your network (Apple, Pi-hole). |
| A public second DNS server | Devices use either one, so they skip your filter. It isn’t a backup (Pi-hole forum). |
No Pi-hole? Use a Filtered DNS Service #
If you don’t have a Pi-hole, or you don’t feel like building one, you can use a filtered DNS service. These are things like NextDNS or AdGuard DNS, which block ads, or Quad9 and Cloudflare’s 1.1.1.1 for Families, which block malware. These also cover a guest network that can’t reach your Pi-hole, because we blocked it off.
| Service | Blocks | Worth knowing |
|---|---|---|
| NextDNS | Ads and trackers; you configure it | Free up to 300,000 queries a month. Past that, it keeps answering without blocking. |
| AdGuard DNS | Ads and trackers | The family server also blocks adult content. |
| Quad9 | Malicious domains | Not ads or spam sites. |
| Cloudflare 1.1.1.1 for Families | Malware and phishing, optionally adult content | Plain 1.1.1.1 doesn’t filter. |
Put it in your router’s DNS settings if your router lets you change them, or on each device. Whatever you pick, if the filter breaks, nothing in the house can look up names, so nothing loads. Know how to switch back.
The Next Rungs #
Those guest networks on the ISP’s modem-router combination are usually all or nothing. A device is either on a separate network and can’t talk to your main network, or it’s on your main network and can talk to everything. That’s where the next rungs on the ladder come in, to solve these problems.
- VLANs and firewall rules. The next level up is when you can have VLANs and firewall rules routing between them. That allows for more personalized access. Say I want my phone to be able to talk to my IP camera in the other room. I can poke just a specific hole for my phone, on one port, to that camera, and not vice versa. So my phone can reach out to my camera, but my camera cannot reach out to my phone. A firewall or router that can do VLANs and firewalling with these rules is the next rung up, and it is pretty nice to have.
- OPNsense. This can really be OPNsense or any firewall, but OPNsense is a free, open-source firewall that you can deploy at home. The main benefit is what you can run on top of it, and just running a proper firewall that can do VLANs, that you can control everything with, and you’re not stuck behind some ISP’s cloud app or whatever.
- Zenarmor, or a proper next-generation firewall. These can do deeper things than just the VLANs and the firewall rules: behavioral analysis, packet inspection, deeper blocking of ads and trackers, and content-based filtering and blocking. It takes you one step further. It gives you that inspection layer.
- Self-hosting, done safely. At the very top: self-hosting your own media servers like Jellyfin or Plex, VPNs, anything like that. When you’ve got stuff open to the wild west internet, you’ve got to take proper care to protect it. That’s DMZs, reverse proxies, inspection, IDS and IPS, maybe with CrowdSec, all that good stuff.
Your List #
Whatever kind of device you’re on: update it, keep the admin and management side locked down, keep the doors shut to the internet, and separate what you don’t trust and make sure that separation works. Add a DNS filter if you want it. I like them a lot; just know the limits. It’s not a catch-all, end-all, be-all kind of thing.
- The router still gets security updates (check the vendor’s site, or ask your ISP)
- Admin password changed from the sticker, and not your Wi-Fi password
- Remote admin off
- Router app account: unique password and MFA
- WPA3, WPA2/WPA3, or WPA2 with AES; WPS off
- Port forwards, DMZ host and UPnP checked; anything you don’t recognize removed
- Firewall on for IPv4 and IPv6
- Devices you don’t trust on the guest network, isolated from your main one
- Tested from the guest network: your main devices don’t answer
- Optional: a DNS filter, with no public DNS as the second server
Most of this is just stuff that you can do on the router you already have. You don’t have to run out and buy a bunch of hardware or tooling or nothing like that. You just open your router settings up, which I’m sure some of you have never done, so it’s a good time to change those passwords anyways, and go through and flip these settings. It’s a great way to learn. It’s going to be confusing when you first get in there, trust me, but just do research, ask AI. It’s a good learning experience, you’ll come out better for it, and your home network will thank you.
If you want to see me make a specific video on these next rungs, or want one first, let me know in the comments on the video. Otherwise, I’ll probably just make them in the order I think they should be in.